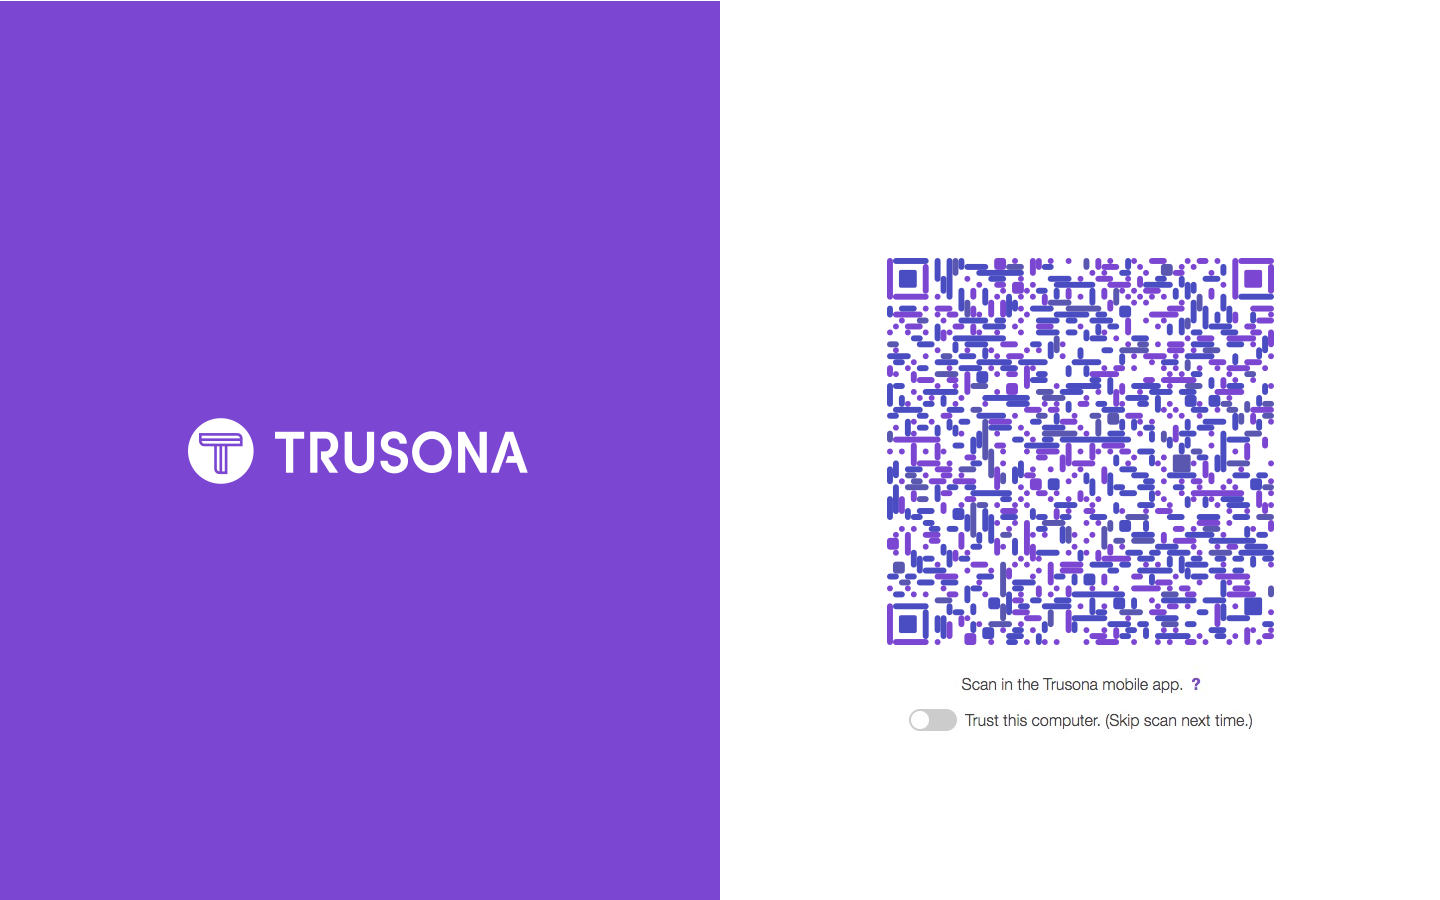
When configured for Okta Cloud IAM, users are redirected to Trusona where they can authenticate using Trusona or optionally by username and password if enabled. Selecting Trusona displays a QR code to be scanned and then a security challenge for the user to Accept or Reject. With this integration, the user is not required to type their username on an Okta landing page so the experience can be fully branded. Since Okta doesn’t see the username, other Okta authentication policies are not available.
1. Prerequisites
Before proceeding, ensure that you have the following steps completed:
- Admin access to Okta Cloud IAM.
- Have admin access to the Trusona Dashboard. If your company does not have an account, visit the Trusona Dashboard to create one. Otherwise, consult with the owner of your company’s Trusona Dashboard account in order to create the integration.
2. Getting Started
2.1. Log into the Okta admin portal
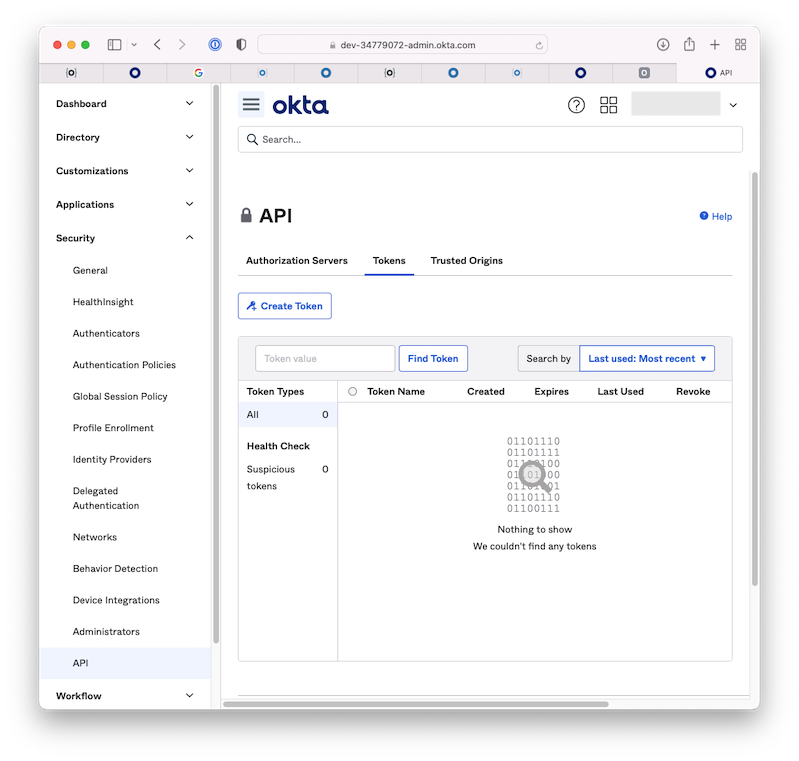
2.2. Create API token
Navigate to Security > API > Tokens and then click the Create Token button. Enter “Trusona”
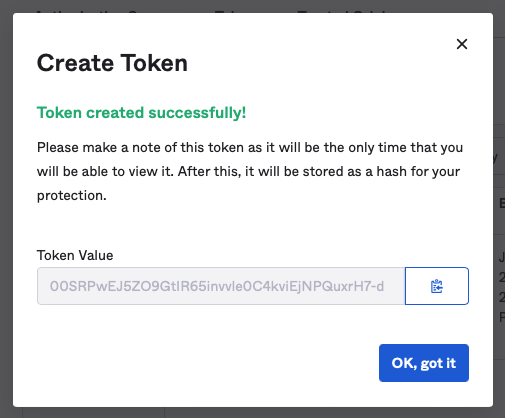
Copy your API token (Token Value) and save it somewhere safe. You will be using it in later steps
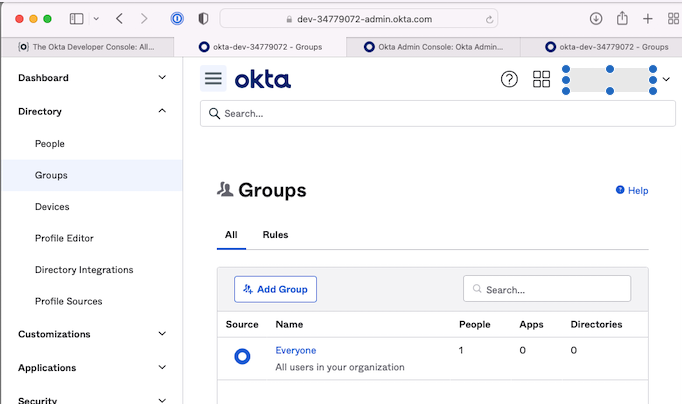
2.3. Create a group
Navigate to Directory > Groups > click Add Group and create a name and a description.
- Name the group Trusona
- Provide a group description
- Click Add Group
This group is used to prevent users, who are using Trusona for passwordless login, from being prompted for an additional second factor of authentication.
You don’t need to maintain the membership of this group. Group membership is automatically managed by Trusona via the Okta API. Do not add any members to the group.
After creating the group, select it from the list of groups, and copy the Group ID from the URL in your address bar, as shown in the following screenshot

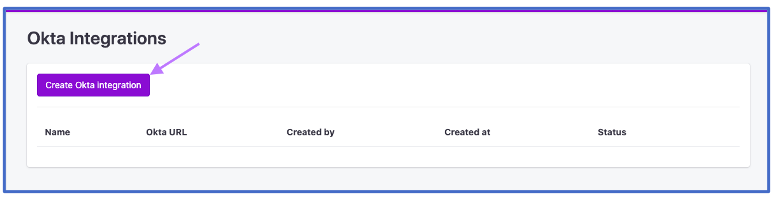
2.4. Create Okta Integration in Trusona
Log into the Trusona Dashboard then navigate to Okta & click on Create Okta Integration.
2.5. Provide Okta configuration
Fill in the 4 input fields as described below:
-
Name
- A meaningful name for the integration.
-
Okta Tenant URL
- This will look similar to https://example.okta.com.
-
API Token
- The value from the token you made in Step 2.2.
-
Group ID
- This is the value from the URL you copied in Step 2.3.
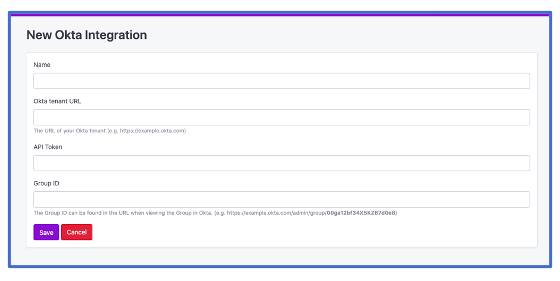
Then click Save to create the Okta integration.
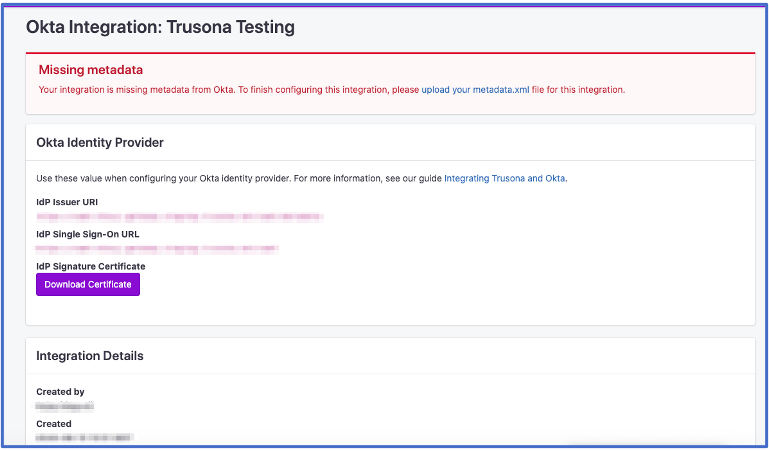
2.6. Okta Identity Provider details
After saving, you will see the SAML specific configuration details needed to complete the Okta Identity Provider configuration. Keep this page open for reference and return to the Okta admin portal.
3. Create an Identity Provider
In the Okta admin portal, navigate to Security > Identity Providers and then click Add Identity Provider.
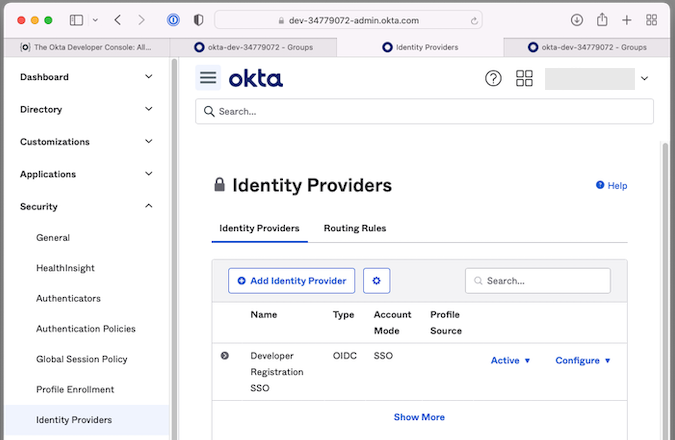
Select SAML 2.0 IdP from the list and click Next
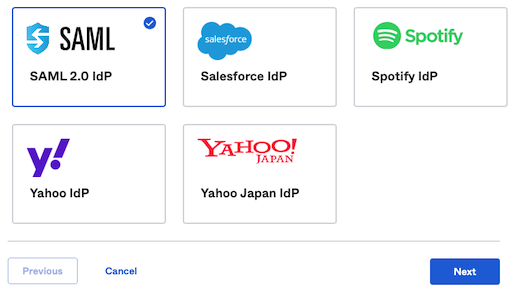
Complete the form to add the new SAML IdP using the information below:
3.1. General Settings
| Field | Value |
|---|---|
| Name | Trusona |
3.2. Authentication Settings
| Field | Value |
|---|---|
| IdP Usage | SSO only |
| IdP Username | idpuser.subjectNameId |
| Filter | Unchecked |
| Match against | Okta Username |
| If no match found | Create new user (JIT) |
3.3. JIT Settings
| Field | Value | Notes |
|---|---|---|
| Profile Source | Unchecked | |
| Group Assignment | Assign to specific groups | |
| Specific Groups | Trusona | This is the group name from step 2.3. |
3.4. SAML Protocol Settings
The exact values needed can be found in the Trusona Dashboard, by either returning to the window from step 2.6, or navigating to Okta and in the Actions submenu for your integration clicking Show.
| Field | Value | Instructions |
|---|---|---|
| IdP Issuer URI | https://gateway.trusona.net/saml/metadata |
|
| IdP Single Sign-On URL | https://<YOUR ORIGIN URL>/saml |
This is unique to your integration with Trusona. and will look something like https://example.gateway.trusona.net/saml
|
| IdP Signature Certificate | Back at the Trusona Dashboard, download the Signature Certificate by clicking the ‘View’ button and clicking ‘Download Certificate’ |
Once the information in the tables above has been entered into the form, click the Finish button to continue.
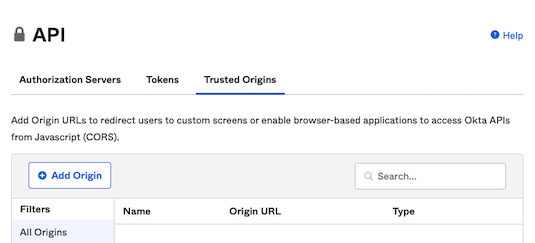
4. Add Origin
Navigate to Security > API > Trusted Origins and click the Add Origin button.
- Name your Origin Trusona.
- To create your Origin url, copy your IdP Single Sign-On from the Okta integration in the Trusona Dashboard then delete the path
/saml. Example:https://example.gateway.trusona.net - Enter you newly created Origin URL.
- Check both CORS and Redirect checkboxes.
- Click Save
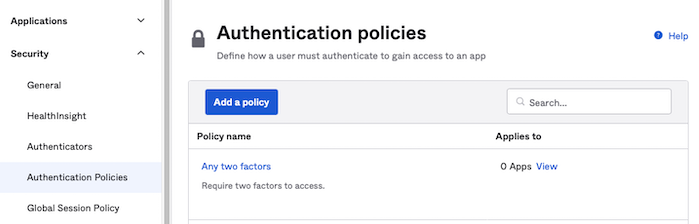
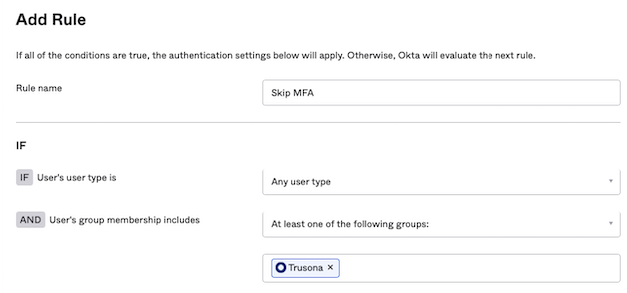
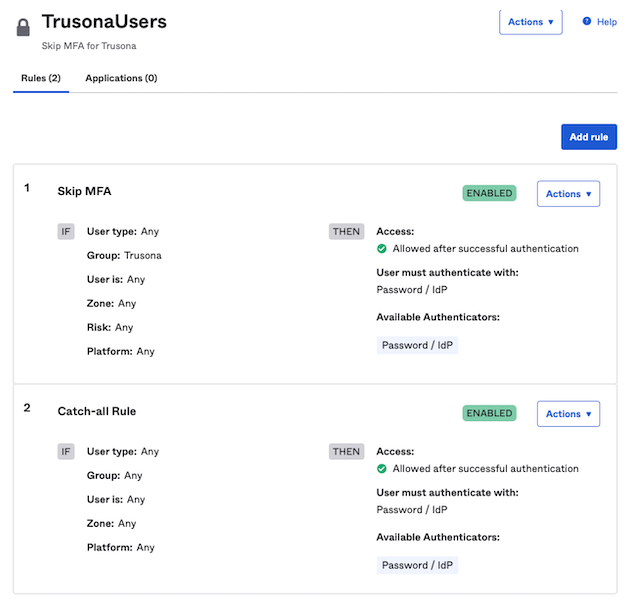
5. Create new Sign-On policy
Navigate to Security > Authentication Policies (or Authentication > Sign on) and click Add a Policy button.
- Enter “TrusonaUsers” for the Policy Name.
- Enter “Skip MFA for Trusona” for the Policy Description.
- Click Save and then Add Rule for your new policy.
- Enter “Skip MFA” for the Rule Name
- Add the group you created in step 5 in the User’s group membership includes section.
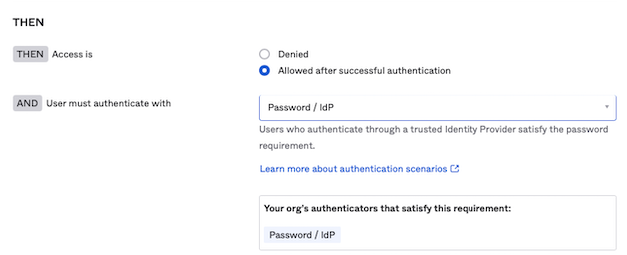
- Select user must authenticate with “Password / IdP” and Click Save.
- If the Catch-all rule shows a warning “Catch-all Rule has authenticator requirements that aren’t satisfied”, edit this rule to select user must authenticate with “Password / IdP” and Click Save.
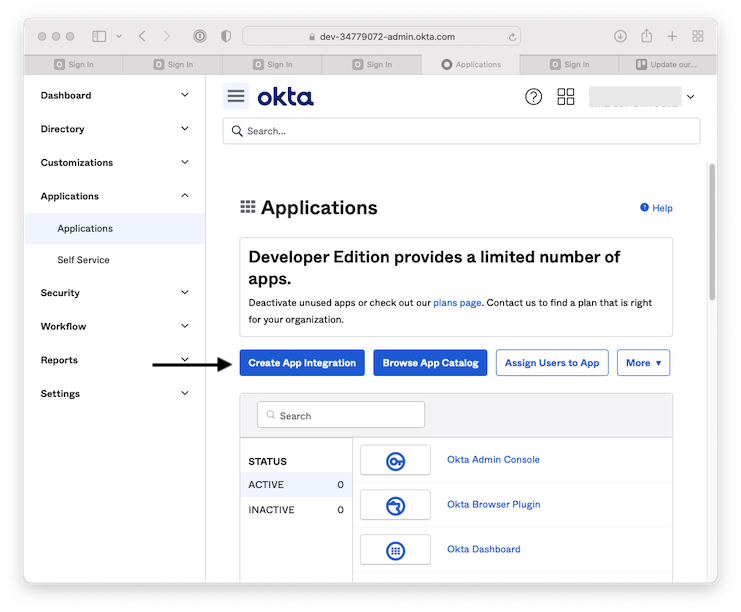
6. Create a Trusona Registration application
The Trusona Registration application helps your users link their Okta account to their Trusona Account. This process guarantees that users are identified by the Trusona IdP with a known and valid Okta identifier. All users that intend to use Trusona to login with Okta should complete the registration process described below before attempting to use Trusona to login to Okta.
6.1. General Settings
- Applications > Applications > Create App Integration.
- Choose the SAML 2.0 option.
- Click Next.
| Field | Value |
|---|---|
| App name | Trusona Registration |
| App logo | Trusona logo |
| App visibility | Unchecked |
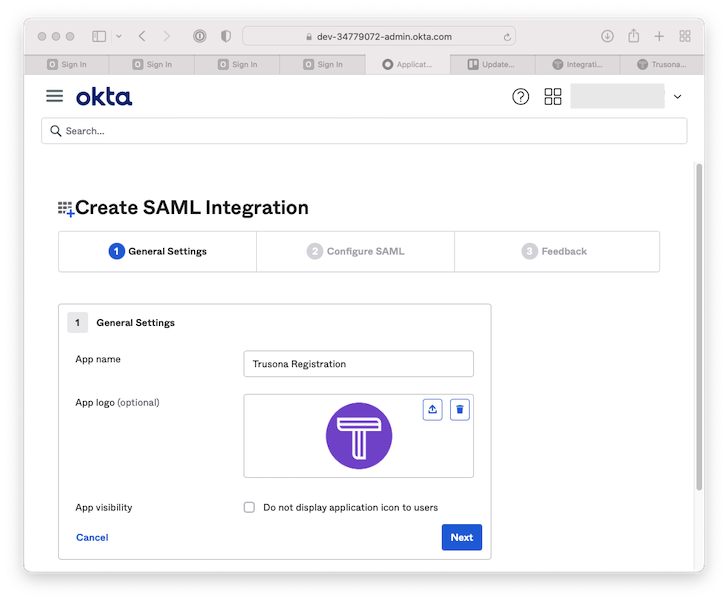
Click Next.
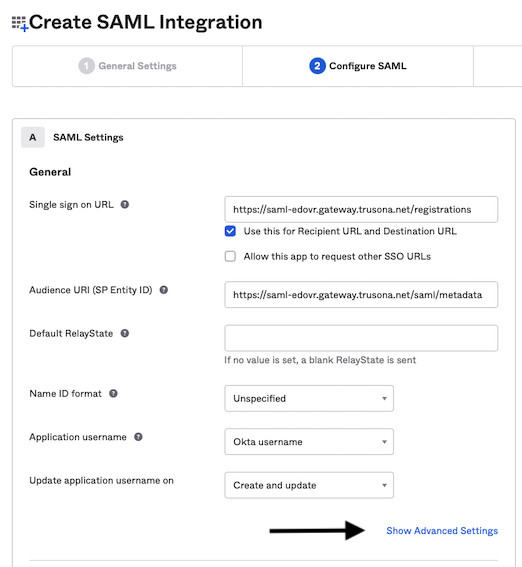
6.2. Configure SAML
The exact values needed can be found in the Trusona Dashboard, by either returning to the window from step 2.6, or navigating to Okta and in the Actions submenu for your integration clicking Show.
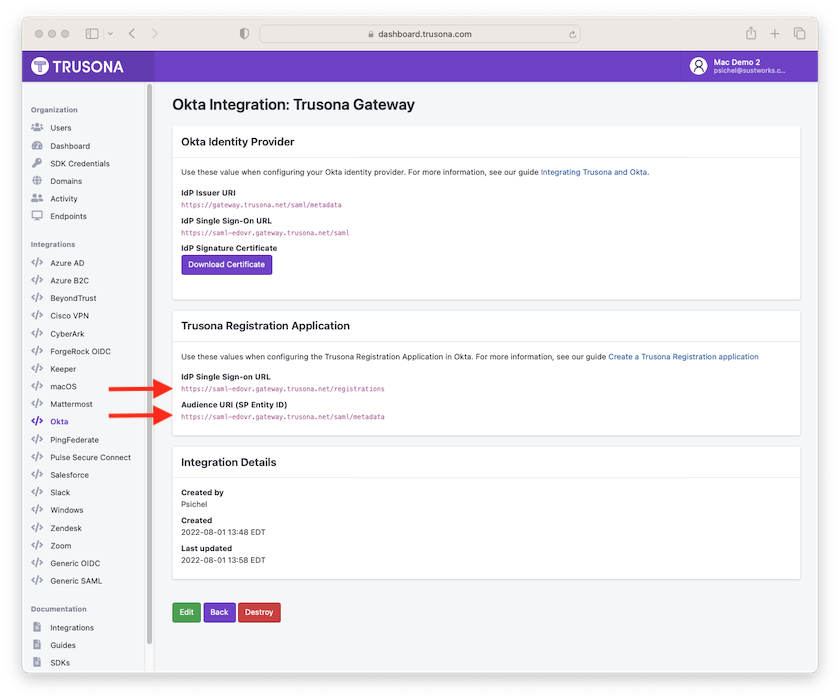
- Enter the Single sign on URL from the Trusona Registrations Application section of the Trusona Dashboard. It should be a URL ending in
/registrationsfor example:https://example.gateway.trusona.net/registrations - Ensure “Use this for Recipient URL and Destination URL” is checked
- Enter the Audience URI (SP Entity ID) from the Trusona Registrations Application section of the Trusona Dashboard. It should be a URL ending in
/saml/metadatafor example:https://gateway.trusona.net/saml/metadata
4. Click on Show Advanced Settings.
5. Set the Response and Assertion Signature to Unsigned (not used for registration).
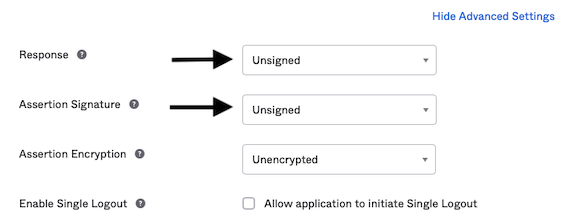
6. Scroll down and Click Next.
6.3. Feedback
- Click the radio button “I’m an Okta customer adding an internal app”.
- Click Finish.

6.4. Upload the Okta X.509 Certificate to Trusona
You should be taken to the Sign On configuration for the Trusona Registration application. To return to this page navigate to Applications > Applications > Trusona Registration > Sign On.
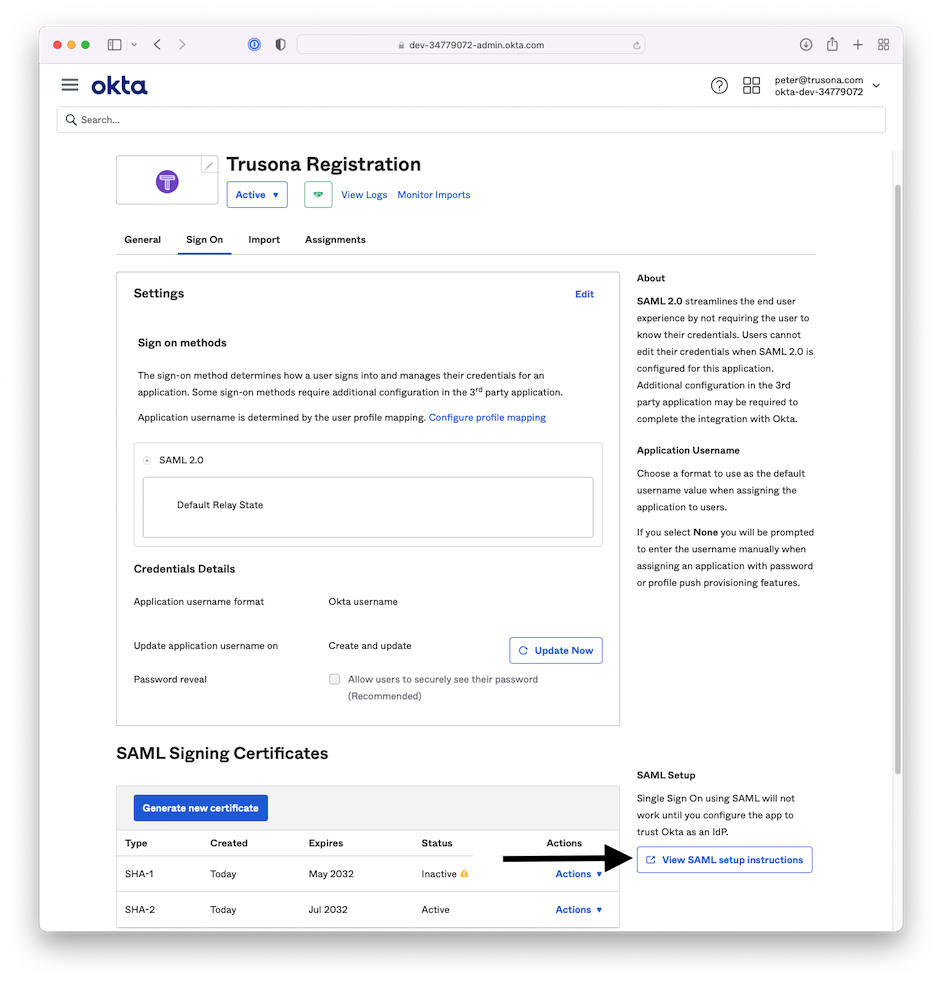
- Click View SAML setup instructions in the lower right hand side bar. Scroll down to X.509 Certificate -> Click Download Certificate.
- Go to the Trusona Dashboard -> On the left hand side, click on Generic SAML integration and the Okta integration you created will be listed.
- Select Actions -> Edit. Under Certificate click Choose File -> Upload the X.509 Okta Certificate.
- Click Save.
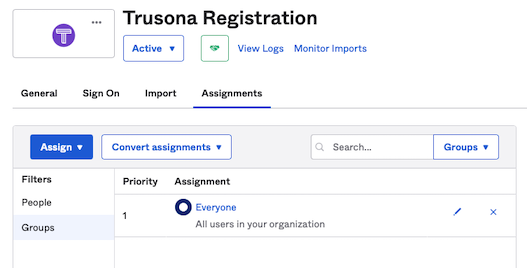
6.5. Create an Assignment
Back in Okta, navigate to Applications > Applications and click on the new Trusona Registration application.

within the Trusona Registration application, click Assign then Assign to Groups
- Find the group called Everyone.
- Click Assign in the row for that group.
- Click Done.
7. Test the Integration
It is important to test that the integration is working before continuing with this guide. If you continue without completed this step, you may lock yourself out of your Okta tenant.
7.1. Identify or create a test user
You can test with either an existing Okta user, or by creating a new Okta user. You can use your own Okta user as long as you have a second user with administrative access that you can use in the event you are unable to login with Trusona.
To add a new user goto Directory > People > Add person.
7.2. Register your test user with Trusona
- Sign in to Okta as your test user.
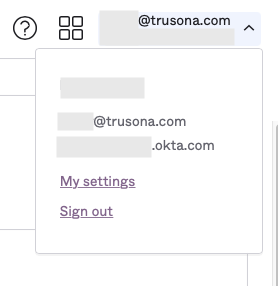
If you don’t see the My Apps page, click on the logged in user drop down (upper right) and then My settings. Then select My Apps on the left.
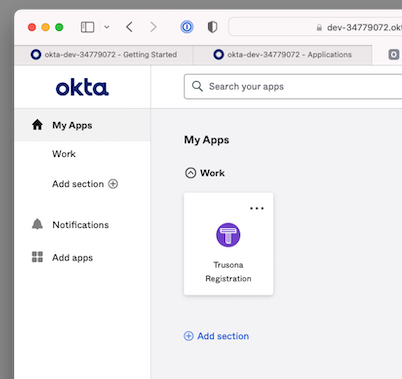
- On the “My Apps” page, select the Trusona Registration application.
- Use your Trusona mobile app to scan the QR code and complete the ensuing authentication request.
7.3. Download metadata from Okta to your Trusona Okta Integration
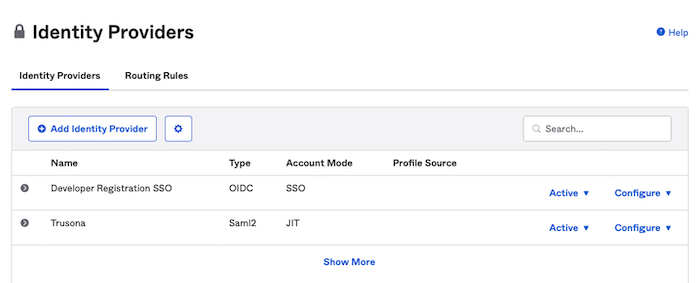
Navigate to Security > Identity Providers. Click on the disclosure triangle to expand the Trusona Identity Provider and then click on Download metadata.
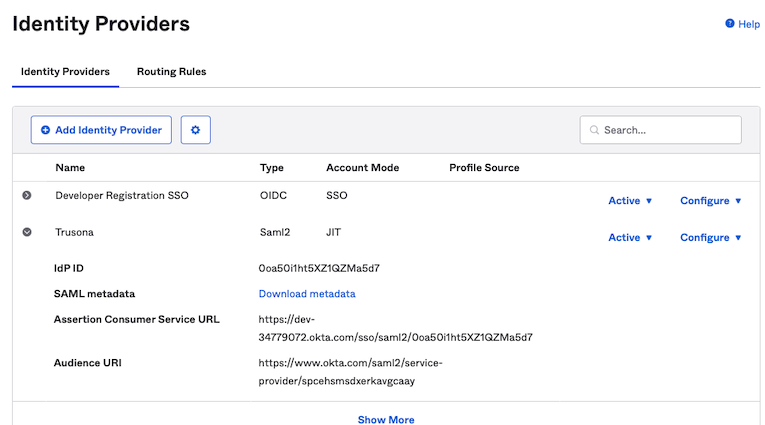
Copy the “Assertion Consumer Service URL”.
Back at Trusona Dashboard > Generic SAML, select Actions -> Edit, then paste the “Assertion Consumer Service URL” in the corresponding field and press Save.
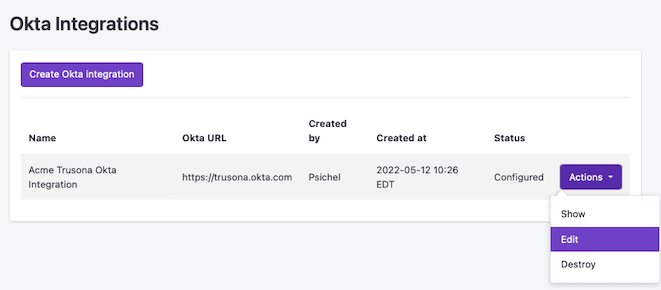
On the Trusona dashboard, select Okta on the left and then Actions > Edit for your Okta Integration.
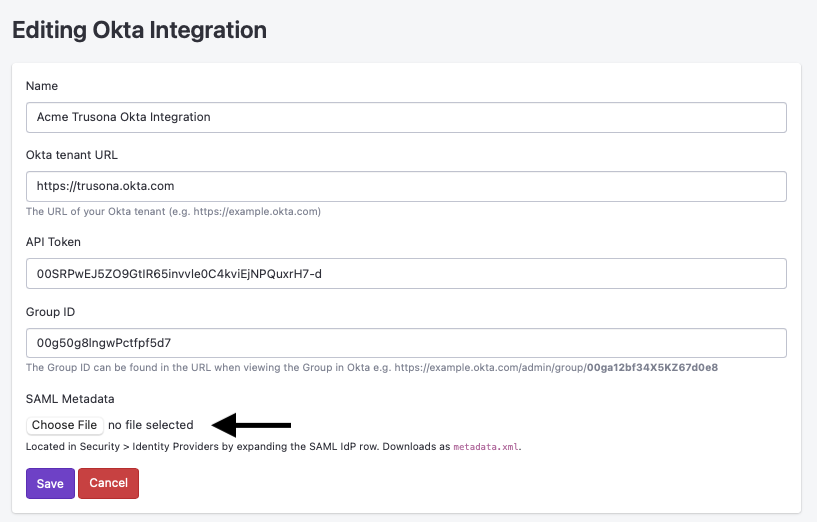
Select the metadata.xml file you downloaded above and click Save.
7.4. Create Routing Rule for your test user
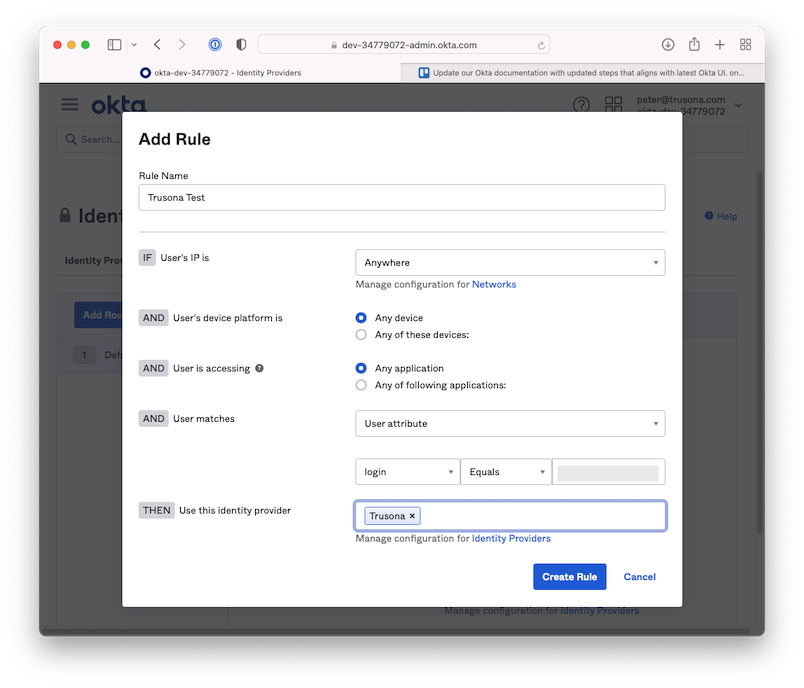
Sign back into Okta with your administrative user (if needed) and navigate to Security > Identity Providers > Routing Rules
- Click Add Routing Rule
- Enter “Trusona Test” for the Rule Name
- For *User matches… pick “User Attribute” from the dropdown
- In the drop down items that appear, select “login”, “Equals” and enter the username of your test user.
- Specify Trusona as the identity provider.
- Click Create Rule, and activate this rule.
7.5. Test the login flow
Now attempt to log in with your test user.
- Enter your test user’s username into the Okta sign in page and click Next. This should take you to Trusona.
- Click Login with Trusona.
- Using your Trusona App, scan the QR code and complete the ensuing authentication request.
- You should now be logged into Okta.
- Trouble shooting tip: If the sign-in process downloads a saml file instead of logging in, try repeating step 6.5 Creating an Assignment.
If you were able to sign in using Trusona, you may continue with this guide. If you got an error, please contact support@trusona.com
Important: If you continue with this guide before correcting any problems encountered during testing, you may lock yourself out of Okta
7.6. Delete the testing Routing Rule
Sign back into Okta with your administrative user and navigate to Security > Identity Providers > Routing Rules
- Select the “Trusona Test” routing rule
- Click Delete
- In the modal that opens, click Delete Rule
8. Create Routing Rule
Note: Do not move onto step 8 until you have completed step 7. Otherwise you may be locked out of your account.
- Navigate to Security > Identity Providers > Routing Rules.
- Click the Adding Routing Rule button.
- Match the fields below.
- Click Create Rule.
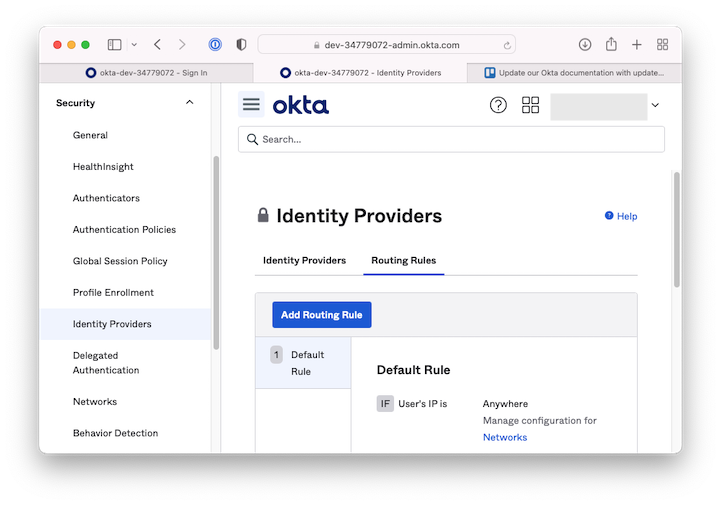
| Field | Value |
|---|---|
| Rule Name | Trusona |
| User’s IP is | Anywhere |
| User’s device platform | Any device |
| User is accessing | Any application |
| User matches | Anything |
| Use this identity provider | Trusona |
Trusona recommends that this newly created routing rule be placed above existing routing rules. This ensures that users are redirected to the Trusona IdP for authentication. Your specific implementation and/or deployment needs may require the rule to be placed somewhere other than first in the list.
8.1. Allowing Trusona or Okta at the Okta Dashboard
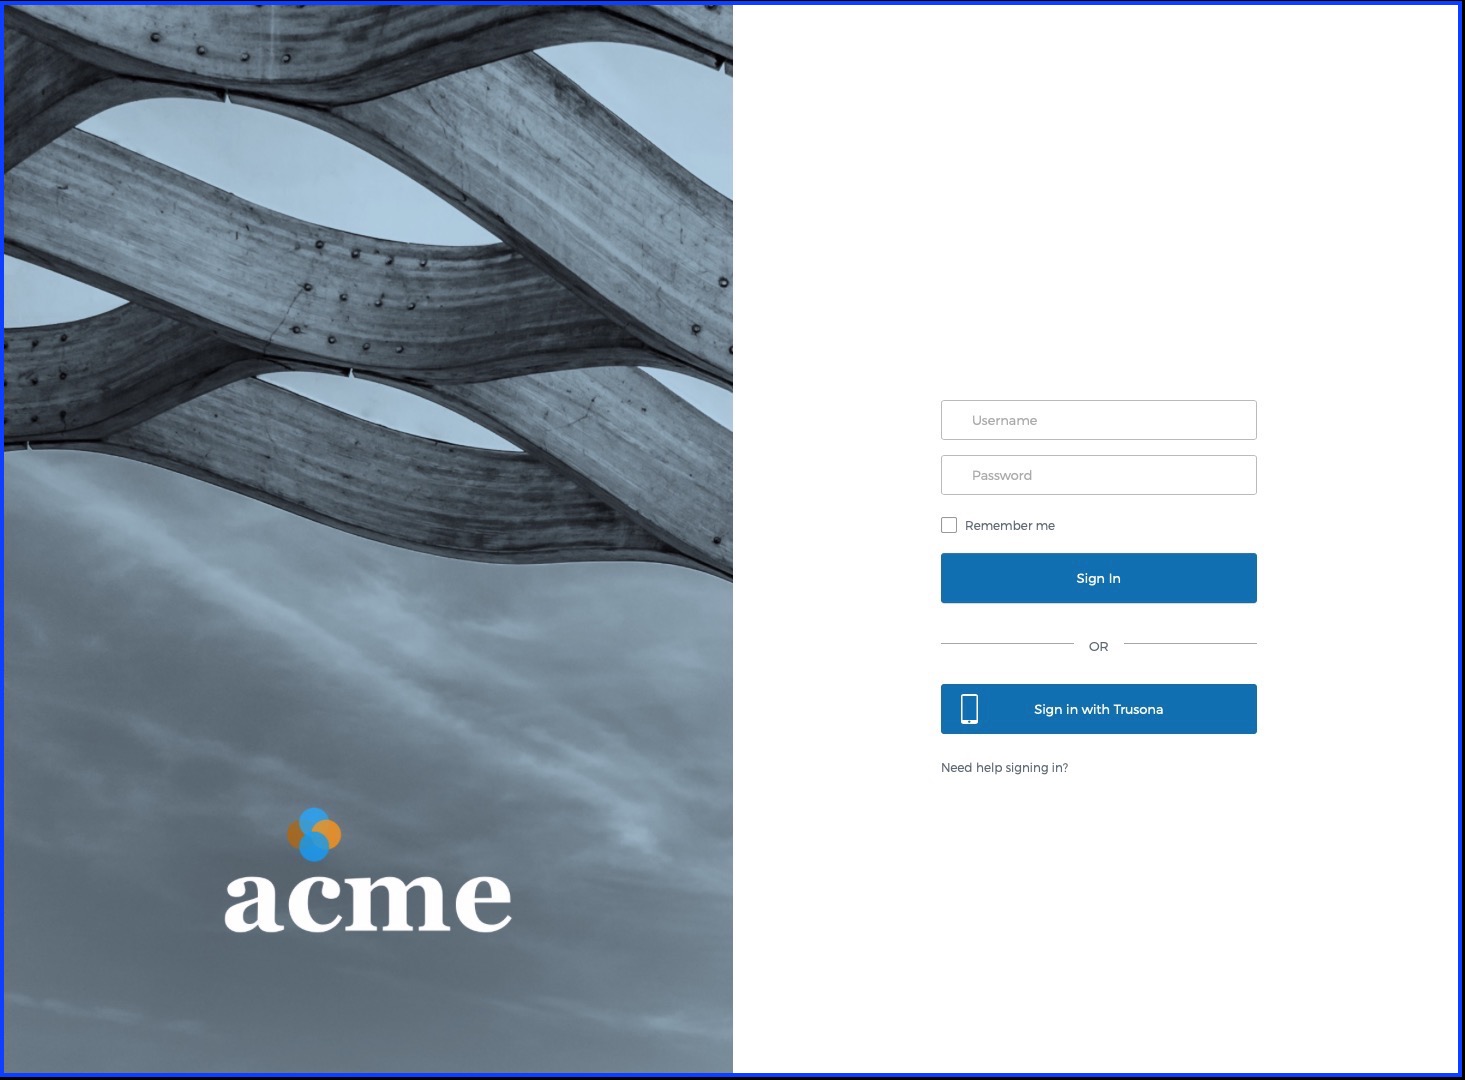
If Trusona is the only item in the Use this identity provider field, the user will be taken directly to the Trusona sign in page. If you want a button on the Okta landing page to “Sign in with Trusona” (or use another method like Okta Verify), you can specify more than one IdP in the Use this identity provider field.
9. Customizing your Trusona experience
The Trusona Gateway (pictured below) includes default styling that will be familiar to your users using the Trusona App.
Optionally, it’s possible to provide a custom branded experience for your users including things like:
- A custom vanity URL
- Custom secure QR code colors
- Your company logo and colors
In order for Trusona to create your custom gateway you need to provide to Trusona hex values and images for the following:
9.1. Provide images
- Hero image: 1440 x 1800 px
- Logo image: 500 x 500 px
9.2. Provide hex values
- Animated dot color: this is the color dots that animate
- List of QR colors: multiples of the same color will appear more (provide 2 hex values)
- Link color: also changes the Okta widget button colors
- Text color:
- Background color: affects background behind the QR, usually we just do pure white (#FFFFFF)

10. Okta Identifier Registration
Users who intend to use Trusona to login to Okta must complete these required one-time steps.
- Download and install the Trusona App.
- Register in the Trusona App.
- Login to Okta using their existing username and password.
- Find, and click on, the Trusona application “chiclet” created in Step 10.
- Scan the QR code with the Trusona App.
- Accept and complete the Trusonafication.
The user’s Okta identifier has now been linked to their Trusona account and they are now ready to use Trusona to login with Okta.
Please see Integrating Trusona and Okta SCIM for SCIM provisioning.